Showing posts with label cinnamon. Show all posts

Friday, January 22, 2016

Apple Pie


Grocery shopping at a commissary on a military post can be interesting sometimes.  There are the unique international products and ingredients that families get hooked on when they are stationed overseas in Germany or Korea.  There are the people who apparently only shop every 3 months or so, dragging a convoy of 2 or 3 heaping cartloads of food.  There are products that appear out of the blue one day and are gone, never to be seen again, the next time you go in.  And there is often an extreme "hit or miss" quality to many things.  My current commissary will occasionally just not have any chicken for days on end.  Like, not one piece, anywhere.  When it finally gets restocked, or is rumored to be restocked soon, someone usually posts about it on the spouse's Facebook page; a chicken forecast, as it were.  Right before we moved here, our commissary had just finished a very extensive remodeling of the deli, and then all of a sudden it closed completely for several months because of some kind of issue with a vendor contract.


The produce is probably the biggest hit or miss item, though.  Some days it's gorgeous and plentiful.  Other days it looks like someone left it in the sun for a few days before putting it on display.  So while I always prepare a weekly menu and a list, I try to be flexible when I go there, because you never know what's waiting for you.  A few days ago I walked in to one of the pleasant produce surprises: beautiful Jonagold apples for 99 cents a pound.  I took just a few home, and my daughter, Violet, and I devoured them.  So crisp and juicy.  Sweet like candy.  All those adjectives that describe the best fall apples.  In January.  In the middle of winter, when really good fresh fruit seems like a distant memory.  A few days later I sent Marc back to the store with instructions to get 4 or 5 big bags to make apple sauce and stewed apples for canning, and I think he brought back about 35 lb.  Seeing all of those lovely, shiny apples reminded me--my last apple pie was really disappointing.  It was time to set that right.


I think every family has certain foods that they associate with specific relatives, whether that's for good reasons or bad.  For instance, Marc associates jello dishes with his grandma, and that doesn't always mean a fond food memory, if I can be diplomatic about it.  Well, in my family, apple pie means my Aunt Linda.  And luckily, it's a really good food memory.


Aunt Lin's advice for addressing my tragic pie situation was that it was all about the apples; you have to have good apples, she said.  Jonathan is the only variety she ever uses.  I already knew I had great apples, and Jonagold are part Jonathan, and good for cooking, so I figured that was a pretty good place to start.  From there, Aunt Lin told me that she just wings it, layering apples with flour, sugar and cinnamon.  That was pretty much the extent of her counseling, so I took it from there, but this recipe is, in fact, more of a method than a real recipe.


I may have mentioned before, I don't really like pie crust.  I don't like eating it, which is, I assume, why I don't really like making it either.  But it's also one of those things that I keep trying to master, because I feel like a good home cook should be able to make a decent pie from scratch.  I'm happy to report that I made a damn good pie crust this time.  Even *I* thought it was great.  And maybe what I'm most proud of is that the pie as a whole turned out awesome, even with my 2 year old "helping" me.  Which is to say that, in some ways, she really did help by doing things like throwing the sliced apples into a bowl, but more often she was creating extra challenges by, say, attempting to throw half chewed apple slices into the bowl when she decided she was done with them, sprinkling WAY too much sugar in one spot, or sticking her finger through the pie dough as I was rolling it out.

Two year olds aside, I find that a good pie is really not that easy of a thing to make, but I feel like I took a huge step forward with this beauty.  Maybe someday I can take over my family's Apple Pie Queen crown when my aunt is ready to relinquish it.


Pastry for 2-Crust Pie

Make sure your butter, shortening and water are all very cold.  I usually cut up the shortening and butter into little cubes, spread it on a plate and then throw it in the freezer for 10 minutes or so.  Also, you can use a manual method for cutting in the shortening and butter, like a pastry blender, or 2 knives, but I'm way too lazy for that nonsense.

2 2/3 cup all-purpose flour
1/2 tsp. salt
2 Tbs. sugar
1/4 cup shortening, cut into cubes
3/4 cup butter (1 1/2 sticks), cut into cubes
5 or 6 Tbs. ice water

Put the flour, salt and sugar in a food processor and pulse several times to combine.  Sprinkle the pieces of shortening across the flour mixture and pulse several times until well distributed.  Add the butter and pulse it in the same manner as the shortening.  Dump the flour mixture into a bowl and sprinkle in 5 Tbs. of ice water.  Stir the flour mixture until the dough just comes together.  Add another Tbs. of ice water if it is still too dry and crumbly.  Divide the dough into 2 portions, shape in a disk and wrap in plastic wrap.  Refrigerate until it's very cold and solid, at least 30 minutes.

Apple Pie

I used a big, deep 9 1/2" pie plate.  It took about 8 cups of apples (7 medium apples) to fill it.  Those smaller, thin Pyrex plates that are sometimes sold 3 to a package would probably require 2 or 3 less apples.  That's a guess on my part.  Basically, you want to fill the plate up entirely with apples and have it mounded slightly in the middle.  Jonathan or Golden Delicious--the 2 apples that you cross to get a Jonagold--both make a good pie, too.  With a lot of apple recipes, I've also done a mixture of half Granny Smith, for tartness, and half a sweet variety.  You don't need much nutmeg, but the freshly ground stuff is infinitely better than pre-ground, if you have the gumption to seek it out.

6 or 7 medium apples, peeled and sliced  (See above note)
dash of fresh ground nutmeg
flour, sugar and cinnamon as needed
1 egg white, beaten

Place a sheet pan in the oven and preheat to 425 degrees.  Roll out the bottom pie crust and place it in the pie pan.  I put the bottom crust in the pan and then put it in the fridge to chill while I peeled and sliced the apples.  Spread a layer of apples across the bottom of the crust and sprinkle with nutmeg, flour, sugar and cinnamon.  Only use the nutmeg on this first layer or the flavor will be too strong.  Continue layering apples, flour, sugar and cinnamon until the pan is full and mounded a little.  Roll out the top crust and place it on top, crimping the edges and beautifying them however you choose.  (I did a rope style edge on mine)  Brush the entire top of the pie with egg white and sprinkle with sugar.  Cut several steam vents in the crust.

Put the pie in the oven on the preheated sheet pan and bake for 20 to 25 minutes, until golden.  Lower the heat to 375 degrees F and rotate the pie.  Bake another 25 minutes.  Cool on a wire rack for a few hours before slicing.  Serve warm or at room temperature.  With ice cream.  It's the law.

Wednesday, August 21, 2013

Two Spice Cupcakes with Cream Cheese Frosting


I don't know about your house, but around here, it's canning time.  This past weekend we made our yearly batch of seasoned tomato sauce, I'm getting ready to do salsa, and tomorrow I need to buy some peaches to try out jam or possibly peach butter.  I'm totally inspired now that we have (and I know how to use) a pressure canner.  We've actually had it for about a year, but I'm not gonna lie, I was scared of it.  Steam is a scary thing.  Steam inside of a closed vessel building up pressure is much scarier still.  When I worked at the military academy at West Point, for our mechanical engineering program we had a steam lab that filled up an entire room and powered light bulbs, and I didn't even like walking in that room when the thing was running.  I always envisioned it blowing up without warning, shards of light bulbs and steaming pipes flying.  Same deal with the pressure canner.  It doesn't matter that the thing has multiple safety mechanisms and redundancies, an exploding pot with burning hot jar fragments slicing through the air was all I could think of.  Luckily my husband is very brave.  Maybe because he has been shot at and I never have.  Or maybe because he has 3 older sisters who tormented the hell out of him growing up.  (My money's on the latter.)  Whatever the reason, he fearlessly took on the pressure canner, and he won.  And you know what?  It was pretty anti climactic.  But now I know how to use it, and I'ma be a canning fool.


I figured old timey books would be filled with preserves, jams, jellies and the like.  They were, but while flipping through one of them, an old, yellowed newspaper clipping fell out and landed in my lap.  It said Two Spice Cake, and I said, hells yeah.  It had been quite a while since I sent any goodies with Marc to work, so I decided to put the canning adventures on momentary hold.  After all, cake goes over better for a meeting than jars of peach butter.  


This recipe was tucked inside the pages of one of the books I got from my grandma Marguerite, and was dated December, 1964.  The only spices it had were cinnamon and ground cloves, both of which I love, so I was instantly intrigued.  Spice cake that relies on the "everything but the kitchen sink" mixture of spices can be delicious too, but I liked the idea of letting those two basic ingredients take center stage.  The recipe at its core seemed sound, so the only tweaking I did was to add salt and vanilla and adjust the mixing method a bit.  The 1964 version was also baked in a tube pan and then dusted with powdered sugar.  I opted for adapting it to cupcakes and then crowned them with a delicious (and lovely) cinnamon flecked cream cheese frosting.  

Ok, enough slacking off with cake.  Time to work on that salsa....


Two Spice Cupcakes

This recipe makes 24 cupcakes.  I used a #24 portion scoop heaping full of batter to fill the pan.

3 cups all purpose flour
1 tsp. baking soda
1 Tbsp. ground cloves
1 Tbsp. ground cinnamon
1/4 tsp. salt
1 cup buttermilk, room temperature
2 tsp. vanilla extract
1 cup butter (2 sticks), well softened
2 1/4 cups granulated sugar
5 eggs, room temperature

Preheat the oven to 350 degrees and line two 12-cup muffin tins with cupcake papers, or grease and flour the pans very well, if you're so inclined.

In a medium bowl, whisk together the flour, baking soda, cloves, cinnamon and salt.  Set aside.  Whisk the vanilla into the buttermilk and set aside.

In a large bowl, cream the butter and sugar together with an electric mixer on medium speed until very fluffy, about 3 to 5 minutes.  Add in the eggs one at a time and mix well after each addition.  Add in about 1/3 of the flour mixture with your mixer on low speed.  Mix in half of the buttermilk mixture, followed by another 1/3 of the flour, the remaining buttermilk and then the remaining flour, stopping to scrape down the bowl as necessary.  Keep your mixer at low speed or you may get a flour facial.

Evenly divide the batter amongst the 24 cups in the pans; you will be filling them fairly full, close to the top of the cupcake paper.  As I mentioned above, a portion scoop is nice here.  Bake for approximately 20 minutes, or until a toothpick inserted comes out with a few crumbs attached, rotating the pans about halfway through baking.  Cool cupcakes in the pans for about 10 minutes, then remove them and put them on a cooling rack.  Once they are completely cool a few hours later, you can finish them with the cream cheese frosting or frosting of your choice.


Cream Cheese Frosting

12 oz. cream cheese, well softened (this is 1 1/2 of the traditional block size)
6 Tbs. butter, well softened (3/4 of a stick)
2 tsp. vanilla extract
2 cups powdered (confectioner's) sugar
1 tsp. cinnamon (optional)

With an electric mixer, beat the cream cheese and butter together and then mix in the vanilla.  With your mixer on low speed, mix in the sugar and cinnamon until creamy and slightly fluffy.  Try not to eat the entire bowl before you can get it on the cupcakes.  Enjoy!


Monday, September 24, 2012

Apple Cake


It's officially fall now, and you know what that means?  Apples!  You know what else I love about fall?  Cakes!  Fall and winter are prime cake baking time because it's finally cool enough to actually enjoy having the oven on, and the cozy feeling that comes with it.  As opposed to summer when, unlike my parents, I will indeed turn my oven on, but when I do, I'm often chased into the basement to get some respite from the heat.  To recap, 2 great things about fall: apples and cake.  There is an obvious next step staring us in the face here, and it's called apple cake.


There must be some kind of apple cake high council that met long ago and ratified the master version of this recipe, because the many variations I encountered were all basically the same at their core.  The amount of oil, sugar, eggs and flour was very similar from one to another.  I saw one that called for half butter and half oil.  I saw a few that called for a bit more flour or a bit less apples than I used.  A few contained nutmeg in addition to or in place of cinnamon.  One more contemporary version called for serving a butterscotch sauce on top, which seemed cloyingly sweet and unnecessary to me.  I love butterscotch as much as the next girl, but do you want to taste the apples or not?  And there was one that called for canned apple pie filling, which is an absolute travesty any time of year, but especially now.  In the end, I went with a version that my mom has always made and has been in her recipe file for decades.  Since it is very similar to most of the recipes I found, and because it was always so good, I changed absolutely nothing.  Who am I to argue with the National Association for Apple Cake Integrity?


Apple Cake

As you can see, I used a 9 x 13 pan, but my sister-in-law makes a similar recipe and uses a Bundt pan.  I like to make a foil liner for the pan when I make a snack cake like this so I can lift the entire cake out of the pan to cut it.  That way I don't scratch up my bakeware with a knife.  I used Granny Smiths because their tartness complements the sweetness of the cake nicely, but the choice of apple is obviously up to you.  The batter will be very thick; it's almost more like a cookie dough than a cake batter.  You will need to smooth it out into an even layer before baking.  I served mine for dessert along with coffee or milk, as the diner preferred, but it was great the next morning for breakfast, too.  Also works well as just an anytime snack. 

2 1/2 cups all purpose flour
1 tsp. baking soda
2 tsp. baking powder
1 tsp. salt
1 tsp. cinnamon
2 cups sugar
1 cup oil
2 eggs
2 tsp. vanilla
3 cups apples, peeled and chopped (if using Granny Smiths, this is about 2 or 3 of the jumbo ones, or 4 to 5 smaller ones)
1 cup pecans, toasted and chopped (optional)

Preheat the oven to 300 degrees.  Prepare a 9 x 13 baking pan by lining with foil and spraying the foil with vegetable oil cooking spray, or leave out the foil and grease and flour the pan.

In a medium bowl, combine the flour, soda, baking powder, salt and cinnamon and whisk until well mixed.  Set aside.

In a large bowl, whisk together the sugar, oil, eggs and vanilla.  Add the flour mixture and stir until just combined.  Add the chopped apples and nuts, if using, and fold into the batter.

Pour the batter into the prepared pan, making sure to spread it out into an even layer and into the corners of the pan.  Bake for 1 hour at 300 degrees.  Allow to cool before slicing.


Sunday, November 13, 2011

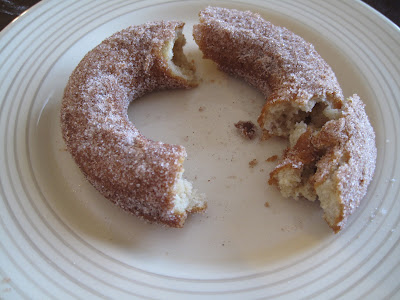
Cinnamon Sugar Cake Doughnuts


I started seeing an acupuncturist recently, which is a really interesting experience.  I don't know why it is that having needles shoved into your ears and forehead is relaxing, but trust me, it is.  Anyway, one of the first things she told me was to think about going gluten-free and dairy-free.  So what did I do?  I went home and thought about it while I made doughnuts.  After taking my first bite, I decided I had thought about it enough.  Honestly, I'm pretty sure I wouldn't even know how to eat gluten-free, but I know for sure it means no doughnuts.  To which I say, no deal.

Our ancestors LOVED them some doughnuts.  Like, really loved them.  At least, I assume they did because almost every single old book in my collection has a minimum of one doughnut recipe.  Most have more than one including at least one cake doughnut recipe and one yeast.  (By the way, if you're wondering why I'm spelling it doughnuts as opposed to donuts, it's because all my old recipes spelled it that way, so it's my homage to those early 20th century cooks.  Ah, the good old days before laziness had even invaded the way we spell things.)  As visual proof of the plethora of doughnut recipes, here's a picture of all my books open to the doughnut page, and this doesn't even include the recipes on my computer from the books that I scanned before I returned them to their rightful owners.


This picture also gives you an idea of where I start with each recipe I work on.  (Recipes from my Grandma are the exception because I just take her original and go from there.)  But generally I get all my old books out and find as many versions as I can of what I want to work on and start cherry picking my favorite ideas from each one, and that was what I did here.  It's especially helpful with these old recipes to have lots to work with because so many of them are so vaguely worded that it really helps to be able to compare them against each other when one calls for "an amount of butter the size of an egg," or to "mix in enough flour to make a stiff dough."  I'm a scientist!  Give me measurements, dammit!  I'm still trying to figure out what it means when they say, "mix all ingredients as for a good cake."  I see that more often than you'd realize.  What do they mean?  Did they ever mix up bad cakes?


There's certainly no bad cake here.  Up to this point, the only doughnuts I had ever made on my own were baked in a doughnut pan with a Stonewall Kitchen mix.  While they are very good, I don't exactly consider them homemade.  They are homemade in the same way that Hamburger Helper is "making dinner."  (Marc can tell you that I laugh sarcastically every time we see that commercial and the people act like they are heroes for throwing some ground beef in a pan with a packet of powdered cheese.)  Stonewall Kitchen's tasty mix notwithstanding, I've now come to the realization that it's really hard to beat a light, cakey doughnut hot out of the oil with a little bit of a crusty exterior.  And given that they are so easy to throw together, why not make your own?

Homer Simpson once asked, "Doughnuts: is there anything they can't do?"  They sure can't make me want to give up gluten.


Cinnamon Sugar Cake Doughnuts

This recipe as written makes about 6 or 8 doughnuts.  I was afraid to make any more than that because I knew Marc and I would have eaten all of them, no matter how many there were.  It should be very easy to double if you want to make a full dozen.  Also, the dough keeps very well in the fridge.  Marc and I made 3 to split for breakfast one morning, then fried up the remaining dough the next day.  There was no difference in the ones that were made from fresh dough and the ones that were made after the dough had been refrigerated.


1 1/2 cups flour, plus a little extra as needed
1/4 tsp. ground nutmeg
1/2 tsp. cinnamon
1 tsp. baking powder
1 tsp. baking soda
1/4 tsp. salt
1 egg
1/2 cup sugar
1 Tbs. melted butter, cooled
1/4 cup buttermilk

Topping

1/2 cup sugar
1 tsp. cinnamon

Whisk together flour, salt, baking soda, baking powder, cinnamon and nutmeg.  Set aside.  Mix the topping ingredients together in a wide, shallow bowl and set aside.  Begin heating about an inch of oil in a Dutch oven.  Put it on a low heat while you mix up the dough.

In a medium sized bowl, beat the egg.  Whisk in the sugar, melted butter and buttermilk in with the egg.  Stir in the flour mixture.  If the dough is very sticky, add more flour, 1 Tbs. at a time, and stir into the batter until it is not too sticky to roll out.  This amount will depend on how much moisture is in your flour and your kitchen in general.  It ended up being 2 Tbs. in my case.

Lightly flour a work surface and pat the dough out into a circle about 1/4" thick.  Remember to occasionally check to make sure it's not sticking to the work surface; add flour as necessary.  Use a doughnut cutter or a couple biscuit cutters to cut out doughnuts and holes.  I used a 3 1/2" biscuit cutter for my outer circle and about a 1 1/2" cutter for the hole.

Boost the heat up on the oil until it reaches 350 degrees.  Carefully pick up the cut out doughnuts with a spatula and slide into the oil.  Fry the doughnuts until golden brown on both sides, about 1 to 1 1/2 minutes per side.  Remove from the oil and drain on paper towels.  Immediately roll in the cinnamon sugar mixture.